


TOP CATEGORIES
Find Your Perfect VDIAGTOOL Scanner


VDIAGTOOL OFFICIAL


VDIAGTOOL VD80BT


VDIAGTOOL VD80BT Lite


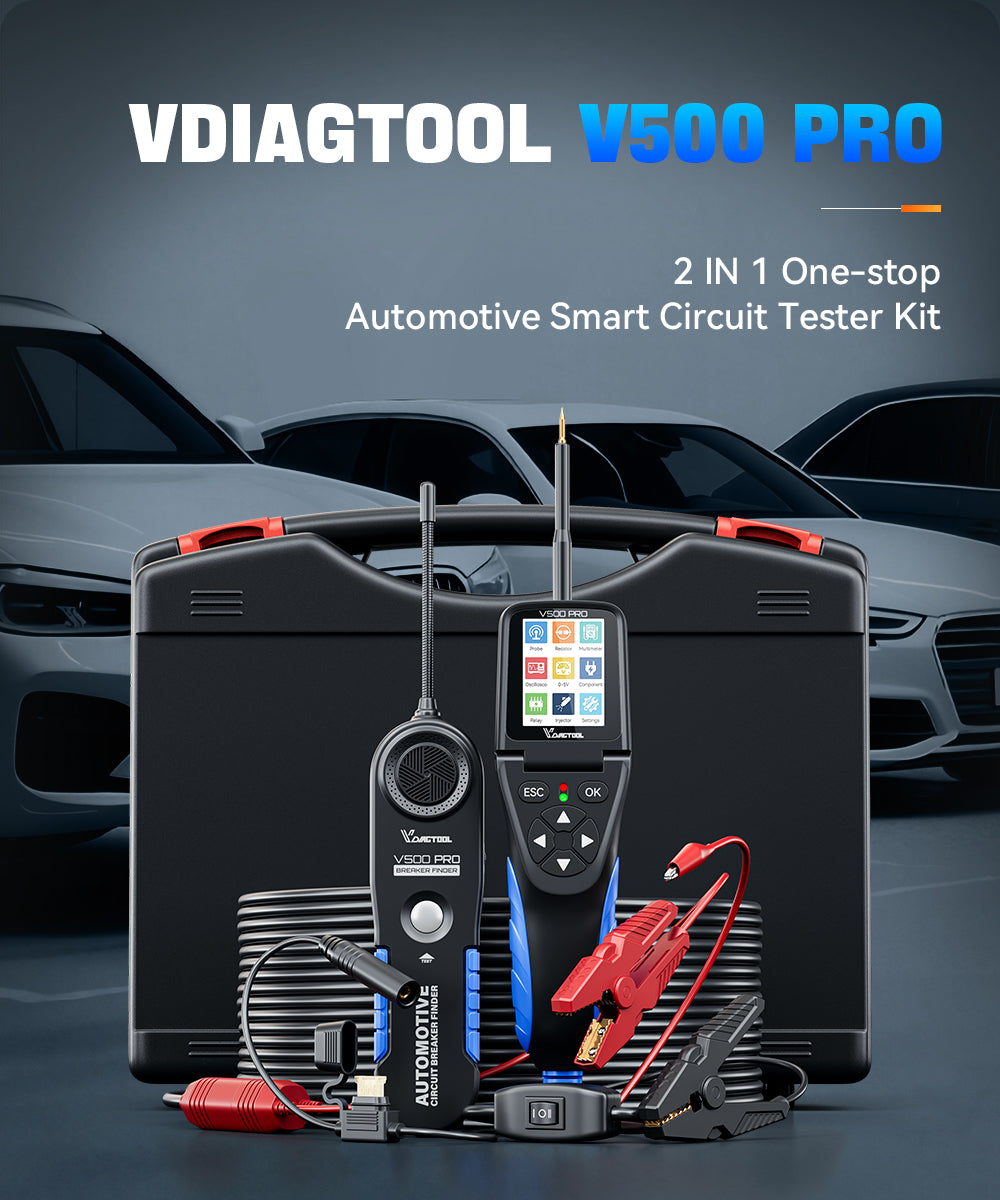
VDIAGTOOL V500 Pro


VDIAGTOOL V210


VDIAGTOOL VD70S


BT500


VD10
VDIAGTOOL V210
VDIAGTOOL VSERIES


VDIAGTOOL V200 Pro Upgrade Kit


V200 برو


VDIAGTOOL V500


V200
VDIAGTOOL V210


Intelligent, Precise, Efficient, Cost-Effective
VDIAGTOOL was founded in 2018 by a team of industry experts with over 20 years of experience in automotive repair and maintenance. We specialize in the research, development, manufacturing, sales, and service of advanced automotive diagnostic tools, testing equipment, and maintenance solutions. Click below to learn more about our journey!
1000+Influencers Recommendations
VDIAGTOOL – Trusted Auto Diagnostics to Make Car Repair Easy & Inexpensive


Let customers speak for us
LATEST NEWS

Understanding FCA AutoAuth and SGW: What You Need to Know
Many of our customers have reached out with questions about FCA AutoAuth and SGW (Security Gateway). This is a common topic for owners of Fiat, Chrysler, Dodge, Jeep, especially when it comes to using diagnostic tools. In this post, we’ll explain what FCA AutoAuth and SGW are, how to ensure your diagnostic device is compatible with your vehicle, and how to access the SGW. VDIAGTOOL Receives Certification by FCA to Access SGW Module Security Gateway Module (SGW) - In 2018, the SGW was implemented by FCA USA to prevent unauthorized access. FCA said that SGW was developed to limit "the ability of non-registered and non-authenticated users to perform intrusive diagnostics such as bi-directional controls", so users cannot directly clear the DTC, as well as any bi-directional control test (including actuation, relearn and calibration) on vehicles equipped with SGW. VDIAGTOOL users can now access the SGW module and perform previously restricted operations simply by registering with the authentication service AutoAuth, without requiring additional accessories. Users can register via AutoAuth's web-based registration portal, selecting the desired package. Then add the VDIAGTOOL diagnostic tool. VDIAGTOOL will release the software to all professional diagnostic tools in the North American market that have subscribed to the software. VDIAGTOOL Receives Certification by FCA to access SGW Module, and perform previously restricted actions, by registering with AutoAuth, an authentication service. VDIAGTOOL Tablet scanner users can register through AutoAuth’s Internet-based registration portal for $50 a year. (Note: This fee and account registration fee are NOT charged by VDIAGTOOL company) The information above indicates that if you cannot find "Transmission" or a similar name in the diagnostic menu, you should locate "Transmission Oil Temperature" under the PID data (live data) menu of the Powertrain Control Module (or PCM). Similarly, if you are looking for the ABS Bleeding feature, you should go to the Special Function under the Brake Control Module (BCM). This approach helps navigate and locate specific diagnostic features within the Diagnostic Tool's interface. *Note: Only available in the US, Canada, and Mexico APP version: FIAT, LANCIA, ALFA ROMEO, ABARTH: V12.00 Chrysler, Dodge, Jeep: V9.80 Registering FCA Doesn’t Guarantee Vehicle Compatibility Even if your vehicle meets the requirements for FCA registration, this does not automatically mean our diagnostic devices will be fully compatible. To ensure that the device supports your vehicle and provides the specific functions you need, please contact us before purchasing. When reaching out, kindly provide your vehicle information, VIN number, and the special functions you would like to perform. Our engineering team will verify compatibility and guide you toward the most suitable device for your vehicle. Steps to Access the SGW For more answers to AUTOAUTH's frequently asked questions, including pricing information, please visit AUTOAUTH FAQs. 1. Account Registration Visit: https://webapp.autoauth.com >> click Register 2. Complete and submit the User Signup 3. An email confirmation will be sent to you. Locate your email and Verify your email address. 4. Log in to the AUTOAUTH website 5. Click Service Center Signup / Independent Technician Signup to register for your shop and to set up your user profile, shop information and payment settings. Note for technicians: If the shop you are working at already has an account with the VDIAGTOOL Diagnostic tool, the administrator of the shop account can invite you to join the shop. After you have been invited, you will see a link to join the shop on the AUTOAUTH website. Once you are added, you will automatically gain access to the shop's registered devices. No further device setup is required from the AUTOAUTH website. 6. Select Manage Tools from the left menu >> select Add Tool, fill in the following Manufacturer - Select VDIAGTOOLTool Model - Select ALL MODELSSerial Number - Enter the serial number listed on the back of your diagnostic tool. (Example: Enter VD70-000001 if your S/N is VD70-000001) For more help, please contact us at service@vdiagtool.com or reach out via our online chat.
Learn more
Why the V500 Pro Oscilloscope is Essential for Automotive Diagnostics
V500 Pro Oscilloscope Basics Automotive diagnostics using an oscilloscope allows users to visualize and analyze electrical waveforms, helping them identify irregularities, faults, or abnormalities in various automotive systems. Unlike traditional diagnostic tools, such as multimeters or scan tools, oscilloscopes provide users with a more detailed and comprehensive view of the electrical signals within a vehicle. This level of precision allows for a deeper understanding of the root cause of a problem, leading to more accurate diagnoses and efficient repairs. This feature is an electronic test instrument that displays electrical signals graphically, usually as a Voltage (vertical or Y axis) versus Time (transverse or X axis). This function can be displayed in vertical or transverse screen. The Voltage on the Y axis shows 0.0V to 10.0V and the Time on the X axis shows 1ms to 500ms. NOTE: Press “OK” button to pause or run waveform refresh. The Role of an Oscilloscope in Circuit Diagnostics Visual fault diagnosis The oscilloscope mode visualizes the signal and intuitively displays the change of the signal shape, which makes it convenient for customers to quickly identify abnormal behavior in the circuit, such as waveform distortion, signal attenuation, and other problems.Detect transient problems Transient problems in the circuit (such as instantaneous voltage spikes, pulse interference, etc.) are sometimes not captured by static measurement tools (such as multimeters). The oscilloscope can display these transient signals in real-time, which helps to find transient faults, such as power supply fluctuations or unstable signals. Frequency analysis The oscilloscope can not only display the waveform of voltage or current but also help users measure the frequency, period, and other characteristics of the signal. This is very useful for debugging and optimizing oscillation circuits, clock circuits, or wireless communication circuits, helping customers accurately diagnose the frequency characteristics of the circuit. Capture repetitive faults For periodic faults, the oscilloscope can find the problem by capturing and analyzing the periodic changes. For example, users can see if there is repeated noise interference or signal interruption, which helps to accurately locate the cause of the fault. Practical Guide to Using the V500 Pro Oscilloscope 1. Power on the V500 Pro and select Oscilloscope from the main menu, then press OK. 2. The screen will display the Direction of LCD menu, where you can choose between two options: Vertical and Transverse. 3. Select Vertical to enter the oscilloscope waveform display interface in vertical orientation. 4. Select Transverse to enter the oscilloscope waveform display interface in transverse orientation. The device will display the Oscilloscope Waveform Display Screen, where you can view real-time voltage waveforms. Final Thoughts The oscilloscope function on VDIAGTOOL V500 Pro is more than just a tool—it’s a powerful way to visualize, analyze, and troubleshoot electrical signals with precision. Unlike traditional diagnostic tools, it helps technicians detect transient issues, analyze frequencies, and identify repetitive faults, ensuring faster and more accurate repairs. For anyone working in automotive diagnostics, mastering the oscilloscope feature can greatly improve efficiency and confidence in fault detection. With the V500 Pro, complex waveforms become clear, and hidden issues are easier to uncover—making it an essential companion for modern diagnostics.
Learn more
Topology Mapping on Mercedes Vehicles with the VD80BT Scan Tool
This guide introduces topology mapping and its benefits, then shows how to use it on your Mercedes with the VD80BT scan tool. With modern vehicles relying on complex ECU networks, VDIAGTOOL VD80BT makes it easier to visualize connections, spot issues, and speed up diagnostics. What Is Topology Mapping in Vehicle Diagnostics? Topology Mapping is a powerful feature that visually represents the communication network between various electronic control units (ECUs) in a vehicle. This graphical tool helps technicians and engineers understand how different ECUs interact through various data buses. It’s especially helpful in modern vehicles with complex systems, as it allows users to see the interconnected structure of ECUs and their communication channels in real-time. Key Benefits of Topology Mapping Network Visualization It provides an overview of how ECUs are linked, showing the interrelationships between components and the network’s structure. Efficient Diagnostics Technicians can easily identify which components are communicating and whether there are any errors or faults in communication, helping to pinpoint issues quickly. Communication Analysis By visually representing communication paths, it highlights which modules may not be responding or are malfunctioning, allowing for quicker troubleshooting and resolution. Improved Problem-Solving With topology mapping, technicians can understand the root causes of issues more clearly and tackle them with greater efficiency, whether it's due to faulty connections or a module failure. How to Use the Topology Mapping Feature on VD80BT Step 1: Start the Diagnostic Tool • Power on the VD80BT diagnostic tool.• The device will automatically run the diagnostic program.• Once the program starts, the diagnostic screen will appear. Step 2: Perform an Auto Scan • On the diagnostic screen, tap Auto Scan.• The VD80BT will automatically scan your vehicle.• Your vehicle information will be displayed. Step 3: Confirm Vehicle Parameterization • Tap the OK button at the bottom of the screen.• The device will show Parameterization of vehicle equipment information.• Tap OK again to enter your vehicle system. Step 4: Access Vehicle Functions • On this page, you can see the functions supported for your vehicle.• Tap Automatic Scan to enter the Topology map. Step 5: Scan for Fault Codes • Wait for the device to scan your vehicle and display any DTCs (fault codes).• You can switch between Topology and List views to examine the DTCs.• Example: On this Mercedes, the scan detected faults in Head Unit (HU) and Electronic Stability Program (ESP). Step 6: Analyze Fault Data • You can tap the Electronic Stability Program (ESP) to see data sent from the Instrument Cluster on the CAN bus.• This indicates if certain data are abnormal or unreasonable. Step 7: Clear Fault Codes • After analysis, tap Clear All DTCs to remove all fault codes from the system. Final Thoughts: Boost Your Diagnostic Efficiency With one tap, it performs all system scans and presents all modules and DTCs in a clear, color-coded layout, boosting diagnostic efficiency by up to 200% and helping you locate issues instantly while reducing repair time and costs. Whether you're a pro boosting efficiency or a beginner learning diagnostics, this OBD2 scanner diagnostic tool makes fault-finding faster and smarter for you.
Learn more
Updating the Software of your BT500 Battery Tester
Keeping your VDIAGTOOL BT500 Battery Tester up to date ensures you always have the latest features, bug fixes, and best performance. The update process is simple and only takes a few minutes with a Windows PC. In this guide, we’ll walk you through the steps to update your BT5600 software easily and safely. This function allows you to update the software of the tool. Requirements: • VDIAGTOOL BT500 battery tester• Windows PC/laptop with USB ports• Included Type-C cable Important Notice: Before downloading the software update package, make sure to temporarily disable any firewall or antivirus software on your computer. After the download is complete, you may safely re-enable them. Download the Update Package • Visit our Techsupport official website: www.vdiagtool.com/support/downloads or reach out to us via service@vdiagtool.com or chat online with us.• Download the BT500 update package to your Windows computer.• Launch BT500.exe on your Windows computer. Update Steps Step 1: Press and hold down the "OK" key on the device while plugging the USB cable into the PC, until the green light is blinking. ⚠️ Important:First, press and hold the "OK" button on the device before connecting it to the computer. Step 2: Click "Update" to reset the memory and update the software to the newest. Step 3: When the software update is complete, you will hear a beep. Status Indicators • Yellow LED flashing → Updating in progress • Green LED on (3 sec) + 2 quick beeps → Update successful • Red LED + continuous 3-sec buzzer → Update failed Important Notes • Do not disconnect during update • Ensure stable power supply throughout the process Conclusion Updating the software of your BT500 Battery Tester ensures that you always have access to the latest features, improvements, and fixes. By following the steps outlined above—downloading the update package, entering update mode, and completing the process on your PC—you can keep your device running smoothly and reliably. If you encounter any issues during the update or have further questions, please don’t hesitate to contact our support team. We’re always here to help and make sure you get the best experience from your BT500.
Learn more
Free Shipping
Fast & free shipping on all orders

Safe Payment
Easy and flexible checkout

30-Day Returns
Hassle-free returns within 30 days

24/7 Support
Round-the-clock support for you